Note: This guide applies to CakePHP 1.3 but may be adapted with relative ease to work with CakePHP 2.x. The guide is based on code from an old project and is intended for use as a guide, it is not a comprehensive “How To”. For the purposes of this guide, I have removed a lot of the more complex back office functions which don’t really serve a purpose here.
I am not going to go through showing you how to set up user auth, access control and shopping cart functionality. It has been documented to death, in this guide I am focusing solely on Paypal integration.
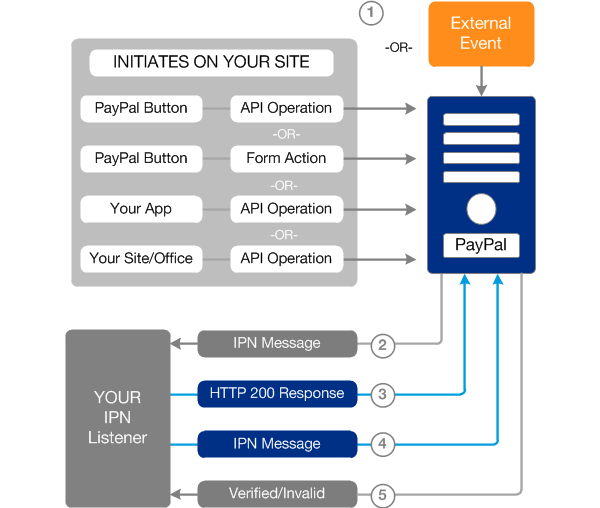
So, you have a CakePHP based web application with a functional shopping cart and you want to integrate it with Paypal IPN? Well you are in the right place! Before we get started, you’ll need to understand a little bit about the Paypal IPN flow.
Paypal IPN flow
- User on your site submits a Paypal Button (a standard form in this case) to the Paypal servers.
- Paypal sends an Instant Payment Notification (IPN) http request to a predefined handler/listener on your site.
- Assuming you have defined the correct IPN URL, your IPN handler will return a HTTP 200 OK response code (otherwise Paypal will keep sending IPN notifications for up to four days).
- Your IPN handler needs to send the complete unmodified notification (as received from PayPal) back to Paypal to validate the notify request. You can do this by prepending the notification with “cmd=_notify-validate”.
- Upon receiving this request, Paypal will reply with a single word – either “VERIFIED” or “INVALID”.
As you can see, it is pretty straight forward process. With the flow above in mind, we will need to do a number of things to get our CakePHP based checkout up and running.
- Setup a Paypal Website Payments Standard compatible form that submits to paypal.
- Create a listener/handler to handle the Paypal IPN and perform some back office tasks on your site.
The Paypal Form
So, first things first, lets create the Paypal form that contains all of the items in our shopping cart. All of the more important form fields are described in the code snippet below.
[snippet id=”139″]
The form is pretty ordinary as far as HTML forms go. You need to make sure that all of your URLs are correct and that you are populating the Cart items correctly in the form.
The IPN handler
Now that we have our form submitting all of our cart details to Paypal, we need to setup our IPN handler that will validate the IPN notification, save the order details and associated items and remove items from the customers cart.
Our controller looks like this.
[snippet id=”140″]
The critical part here is the “process_ipn” function. This is the function that validates the IPN notification. The “processOrder” function is not complete and is purely for demonstrative purposes and to give you an idea of how you might parse the the IPN details and start your back office workflow.
Routes to the handler
You may have noticed in the form code above, that I am pointing Paypal to some nice clean URLs, but can’t figure out how these line up with my IPN controller. I use CakePHP routes for nicer URLs.
See app/config/routes.php
[snippet id=”141″]
Validation Methods
This guide uses postbacks to validate your transaction. The preferred way to validate your transaction is via “shared secret” because it ensures the validity of the data while decreasing traffic two/from your site. However to implement this approach, you need dedicated hosting (not shared), SSL and you need to be using Encrypted Website Payments – making the postback method much cheaper to implement.
Further Security for the postback method
Worried about the potential for fraud in the postback method? Don’t be! The great thing about the postback method is that you can compare the items in the IPN against customers cart contents (and transaction value) before returning the IPN back to Paypal (see comments in the controller code above) to check that the initial post variables have not been modified.
You can also perform the same (or a similar) check after you have received the “Verified”/”Invalid” message if you need to automate some back office tasks such as locking a user account or mailing an in-house fraud team.
